Awnings are an excellent addition to any mobile home. Not only do they provide shade and help lower cooling costs, but they also allow you to customize the exterior design of your home. With so many awning types, sizes, colors and styles to choose from, it can be tricky to select the perfect option to complement your mobile home.
This comprehensive guide covers everything you need to know about finding the ideal awning solution. We’ll discuss the benefits of awnings, help you determine the right type, size, and installation method for your needs, provide styling and decor tips, and outline proper care and maintenance. By the end, you’ll have all the information you need to give your mobile home a shade-providing facelift with a fashionable, functional awning that expresses your unique style.
- What are Awnings and Their Importance for Mobile Homes?
- Benefits of Awnings for Mobile Homes
- 1. Protection from the Elements
- 2. Create Shaded Outdoor Living Areas
- 3. Enhance Energy Efficiency
- 4. Prevent Fading and Glare
- 5. Customize Curb Appeal
- 6. Increase Property Value
- Choosing the Right Awning for Your Mobile Home
- Types of Awnings Suitable for Mobile Homes
- Retractable Awnings
- Stationary Awnings
- Portable Awnings
- Materials and Durability Considerations
- Weather Resistance
- Ease of Maintenance
- Longevity
- Designing and Installing Your Mobile Home Awning
- Customizing Your Awning to Complement Your Mobile Home
- Installation Process and Considerations
- Professional Installation vs. DIY
- Permits and Regulations
- Proper Anchoring and Support
- Utilizing Awning Space for Functional and Aesthetic Purposes
- Creating an Outdoor Living Space with Awnings
- Incorporating Lighting and Heating Elements
- Personalizing Awnings with Decorative Accents
- Maintaining and Caring for Your Mobile Home Awning
- Regular Cleaning and Maintenance Practices
- Preventing Mold and Mildew
- Inspecting for Wear and Tear
- Repairs and Replacements
- Enhancing Energy Efficiency and Sustainability with Awnings
- Awnings as Passive Cooling Solutions
- Harnessing Solar Energy with Solar Panel Awnings
- Final Thoughts on Stylish and Functional Awnings for Mobile Homes
What are Awnings and Their Importance for Mobile Homes?
Awnings are roof-like structures made of cloth, aluminum, acrylic or vinyl that extends over windows, doors, patios, or decks to provide shade and protection from the elements. For mobile homes, retractable, stationary, and portable awnings are common options.
Awnings are important for mobile homes for several key reasons:
- Provide shade and keep interiors cooler – By blocking sunlight and heat, awnings can reduce air conditioning costs in summer.
- Protect against weather damage – They form a barrier from rain, wind, hail and snow to safeguard windows, siding, doors and outdoor living areas.
- Create outdoor living spaces – Awnings let you enjoy decks, patios and yards safely shaded from sunlight.
- Enhance curb appeal – Stylish awnings boost aesthetic appeal and allow you to customize the look of your mobile home.
- Offer versatility – Retractable and portable options allow you to adjust awnings based on weather and sun conditions.
Investing in the right type of high quality awning tailored for your mobile home can help reduce energy costs, prevent weather-related wear and tear, and expand your home’s livable footprint.
Benefits of Awnings for Mobile Homes
There are many excellent benefits to installing an awning on your mobile home:
1. Protection from the Elements
Awnings provide excellent protection from the sun, rain, wind, and other elements. By blocking out sunlight, they can lower indoor temperatures by up to 20 degrees Fahrenheit to cut down on air conditioning costs. Awnings also protect siding, windows and doors from damage related to weather and intense sunlight such as fading, cracks and wood rot.
2. Create Shaded Outdoor Living Areas
Enjoy outdoor deck, patio and yard spaces safely shaded under an awning. Retractable awnings allow you to adjust the amount of shade as needed. Turn areas near your mobile home into comfortable gathering spots for dining, relaxing or entertaining.
3. Enhance Energy Efficiency
Studies by the Professional Awning Manufacturers Association found awnings can lower indoor temperatures by up to 77 percent to cut down on cooling costs. This makes awnings an energy efficient addition to reduce electricity bills.
4. Prevent Fading and Glare
Protect indoor furnishings, carpets and window treatments from fading due to intense sunlight. Awnings also reduce glare on televisions and computer screens making indoor spaces more comfortable.
5. Customize Curb Appeal
Choose from a wide selection of awning styles, colors and patterns to complement your mobile home’s exterior. Coordinate with existing color schemes or select bold, contrasting colors to make your home pop.
6. Increase Property Value
An attractive, well-installed awning can increase your mobile home’s value, appeal to future buyers, and support higher resale prices. This makes awnings a wise investment for the long-term.
Choosing the Right Awning for Your Mobile Home
With many types of awnings to select from, it’s important to pick the best match for your specific mobile home setup and needs. Key factors to consider include:
Types of Awnings Suitable for Mobile Homes
The three most common awning varieties used for mobile homes include:
Retractable Awnings
Retractable awnings offer the versatility of adjustable shade. Manual or motorized systems allow you to extend and retract the awning as needed. Benefits include:
- Adjustable shade coverage.
- Available in multiple widths up to 40 feet wide.
- Manual or motorized to suit needs.
- Can retract against the mobile home when not in use.
Consider pitch, valance styles and accessory options like screens and curtains for customizable functionality.
Stationary Awnings
As the name implies, stationary awnings provide fixed overhead shade. With no moving parts, these tend to be more affordable but offer less flexibility. Great for permanently shaded spots. Types include:
- Entry awnings – Mount over doors to provide shade and weather protection when entering or exiting the home.
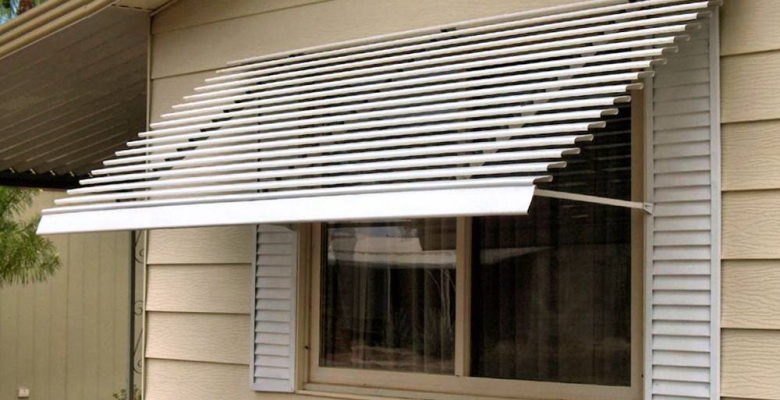
- Window awnings – Mount above windows as decorative accents and to prevent direct sunlight from entering.
- Patio awnings – Install as covers for outdoor seating areas, over trailer hitches or slide-outs.
Match widths and projection sizes to specific areas needing shade. Consider hip vs. dome shapes based on look and water runoff needs.
Portable Awnings
Lightweight, removable portable awnings deliver targeted shade anywhere. Common options include:
- Umbrellas – Classic umbrella designs provide adjustable coverage and portability.
- Pop up canopies – Quickly set up temporary shade with foldable, adjustable aluminum frame canopies.
- Screens – Lightweight screens mount over doors or windows for customizable protection and visibility.
Match sizes, frames and bases to intended uses. Select water and UV resistant fabrics that are easy to install, clean and store when not needed.
Materials and Durability Considerations
The right awning material will provide protection from the elements, require minimal upkeep and stand the test of time. Compare options in terms of:
Weather Resistance
Look for durable awning fabrics and frames able to withstand sun
exposure, wind, rain and snow. Acrylic and polyester fabrics resist fading and offer UV protection. Aluminum frames are lightweight, waterproof and strong.
Ease of Maintenance
Minimal maintenance materials will save you time and hassle. Look for mold, mildew and fade resistant awning fabrics that easily wipe clean. Powder coated aluminum frames add durability and protection.
Longevity
Choose commercial grade materials tested to stand up to years of use and wear-and-tear. Favor thicker awning fabrics around 16 ounces per square yard or more. Select durable frames and hardware backed by generous manufacturer warranties.
Designing and Installing Your Mobile Home Awning
Careful planning during the design and installation process ensures your awning offers an attractive accent that provides optimal shade coverage.
Customizing Your Awning to Complement Your Mobile Home
Factor in size, placement, style and color options to select awnings that enhance (rather than overwhelm) your mobile home. Things to consider:
- Available mounting space on exterior walls, roofline and potential freestanding posts.
- Size and dimensions of windows, doors or outdoor living areas needing shade.
- Overall aesthetic, color scheme and style of your home’s exterior.
- Your interior floor plan and how far shade needs to extend from the sides of the home.
This helps determine ideal awning types, sizes and styles. Retractable awnings give the most flexibility for adjustable customized shade. Freestanding stationary post or patio mounts also leave siding intact.
Installation Process and Considerations
Proper installation ensures safety, full functionality, and optimal shade coverage. Compare DIY vs. professional install along with the following considerations:
Professional Installation vs. DIY
While DIY kits allow you to install awnings yourself, professional installation offers added benefits:
- Knowledge installing awnings on mobile homes specifically.
- Access to equipment needed for tall mobile homes.
- Awning customized to match exact measurements.
- Warranties from installation errors or accidents.
This often makes professional installation the smarter, safer choice despite higher upfront costs.
Permits and Regulations
Most areas allow DIY awning installs without permits if mounted to your own mobile home. However, regulations vary based on location. Before installing:
- Check local codes and homeowner bylaws for requirements.
- Ask park management about altering your lot or exterior.
- Acquire any needed permits before starting.
Review paperwork to ensure you follow proper protocols to avoid fines, fees or removal demands.
Proper Anchoring and Support
Awnings require sturdy anchoring points on the mobile home and frame support posts sunk into the ground. This keeps the awning securely in place. Consider:
- Reinforced mounting points on exterior walls or custom freestanding posts.
- Concrete footings for underground support posts.
- Frame attachments capable of withstanding wind and weather.
- Manufacturer guidelines for necessary mounting and anchors.
Don’t cut corners on proper anchoring. This prevents safety issues and damage from detached awnings in storms.
Utilizing Awning Space for Functional and Aesthetic Purposes
The right accessories make awnings useful covered spaces rather than just roof attachments. Optimize awnings by:
Creating an Outdoor Living Space with Awnings
Furnish the shaded area under your awning to create a usable outdoor living area. Options include:
- Patio furniture like dining sets, loungers, and hammocks.
- Decorative touches like plants, pottery, and garden art.
- Functional additions like fans, lighting, curtains and storage.
- Protective features such as screens, roll down shades and privacy panels.
This transforms empty space into a designated spot for relaxing, dining and entertaining outdoors.
Incorporating Lighting and Heating Elements
Don’t limit awning use to sunny days. Allow enjoyment any time with:
- Lighting – Hang string lights or install recessed lighting to illuminate night use.
- Heaters – Mount infrared or portable heaters to use the space even when temperatures drop.
- Fans – Circulate cool breezes with ceiling fans or portable options.
Control features with convenient switches or smart technology to easily adjust the environment.
Personalizing Awnings with Decorative Accents
Stamp your unique style on awnings with decorative customizations like:
- Contrasting stripe colors along edges or seams.
- Monograms, nameplates or street numbers.
- Custom embroidery, patches or graphics.
- Painted design patterns along frame edges.
- Fringe, decorative trim or contrasting fabric valance accents.
This allows you to highlight your awning as an intentional design feature rather than just an add-on accessory.
Maintaining and Caring for Your Mobile Home Awning
Like any exterior element, awnings require regular care and maintenance to stay looking their best. Build these tasks into seasonal home maintenance routines:
Regular Cleaning and Maintenance Practices
Catch minor upkeep needs before they become big repair headaches. Make it a habit to:
Preventing Mold and Mildew
Since awnings cover outdoor areas prone to moisture, keep an eye out for dark mold and mildew growth. Stop it early by:
- Letting awnings dry fully after rain before retracting.
- Running temporary heat under retracted awnings to evaporate moisture.
- Quickly cleaning minor growth with mild detergent and water.
- Using mildew-resistant vinyl or acrylic awning materials.
Inspecting for Wear and Tear
Check at least twice yearly for signs of wear including:
- Holes, tears or seam separations in fabric.
- Cracked, peeling or rusted frames.
- Loose anchors, attachments or hardware.
- Leaning or misaligned support posts.
Catch issues early before they worsen or compromise safety. Have pros make any needed structural repairs.
Repairs and Replacements
To maximize lifespan, have awnings professionally serviced every two to three years. Techs will:
- Reinforce loose bolts, connections and anchors.
- Seal any small holes and re-stitch separated seams.
- Replace worn parts like fabric panels or hardware.
Don’t wait until major failures. Regular upkeep preserves function and keeps awnings looking their best.
Enhancing Energy Efficiency and Sustainability with Awnings
Beyond providing shade, today’s awnings offer eco-friendly functions like passive solar properties and solar-powered features. Green awning benefits include:
Awnings as Passive Cooling Solutions
Studies confirm shade awnings can reduce indoor temperatures by up to 20° Fahrenheit to cut air conditioning costs. The Professional Awning Manufacturers Association found awnings can block up to 77% of summer heat to lower cooling bills.
As passive cooling solutions, awnings provide effective shade without the carbon footprint of increased AC use. This makes them a smart eco-friendly addition.
Harnessing Solar Energy with Solar Panel Awnings
Some retractable awning models integrate solar panels to convert sunlight into usable electricity. Benefits include:
- Solar panels mounted at optimal angles to capture sunlight.
- Clean, renewable power production from the sun.
- Energy cost savings by reducing electric bill expenses.
- Battery storage options for powering lights, appliances and devices.
Position solar awnings to maximize solar exposure. Track production via smart monitors to optimize solar harvesting throughout daytime hours.
Final Thoughts on Stylish and Functional Awnings for Mobile Homes
Adding awnings allows you to put a personal stamp on mobile home style while enjoying practical benefits like shade and protection. With many types, installation options and accessories to choose from, select choices that best suit your home’s unique needs and design aesthetic.
By understanding the right awnings features, customization possibilities, and proper installation considerations covered in this guide, you can give your mobile home an upgraded look with better comfort, functionality and sustainability.