Selecting the right ceiling fan for a room with low ceilings can be a challenging task. With limited overhead space, it’s important to find a fan that provides optimal airflow while fitting the room aesthetics. In this comprehensive guide, we’ll explore the key factors to consider when choosing a low-profile ceiling fan, from blade span to noise levels and efficiency.
We’ll cover the unique benefits of flush mount ceiling fans, tips for ideal placement and mounting, must-have features to look for, and step-by-step installation and maintenance guidance. By the end, you’ll have all the information you need to choose and install the perfect ceiling fan for any low-ceiling room.
- Choosing the Right Ceiling Fan for Low Ceilings
- Exploring Flush Mount Fans
- Overview of Flush Mount Fans
- Advantages of Flush Mount Fans
- Considerations for Installation
- Selecting the Appropriate Mounting System
- Ideal Placement and Height
- Optimizing Airflow for Low Ceilings
- Installation Tips and Considerations
- Features to Look for in Ceiling Fans for Low Ceilings
- Size and Blade Span
- Motor Power and Efficiency
- Noise Levels
- Style and Aesthetics
- Installing and Maintaining Ceiling Fans for Low Ceilings
- Step-by-Step Installation Guide
- Maintenance Tips for Optimal Performance
- Troubleshooting Common Issues
- Maximizing Comfort and Efficiency
- Optimizing Air Circulation in Low Ceiling Rooms
- Energy Efficiency and Cost Savings
- Final Thoughts on Selecting the Perfect Ceiling Fan for Low Ceilings
Choosing the Right Ceiling Fan for Low Ceilings
Exploring Flush Mount Fans
Overview of Flush Mount Fans
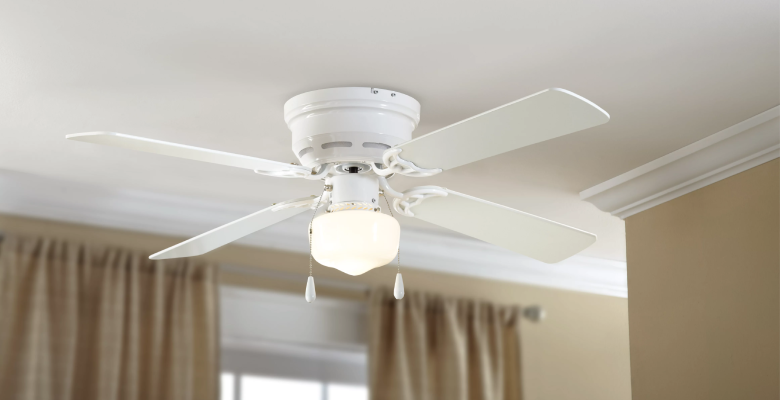
Flush mount ceiling fans, sometimes called low-profile or hugger fans, are specially designed for rooms with lower ceilings. These fans mount directly to the ceiling instead of hanging down on a rod. This makes them perfect for ceilings less than 8 feet high, where a traditional hanging fan would be unsafe or unattractive.
Flush mount ceiling fans come in a wide variety of sizes, finishes, blade shapes, and lighting options. Many are ENERGY STAR rated for efficiency. The motors are designed to move air efficiently even when installed closer to the ceiling.
Advantages of Flush Mount Fans
There are several key reasons flush mount fans are a great choice for low ceilings:
- More clearance – Without dangling rods, flush fans can be installed safely even with very little space between the blades and floor.
- Aesthetics – Flush fans blend seamlessly into the ceiling for a clean, attractive look.
- Less wobble – Being mounted securely against the ceiling reduces vibrations for smooth, quiet operation.
- Easy control – Flush fans often feature remotes or wall controls since pull chains would be inconvenient.
Considerations for Installation
While flush mount ceiling fans don’t require as much overhead space as hanging fans, there are still important clearance considerations during installation:
- Measure carefully to ensure sufficient clearance between the blades and floor. At minimum, 7 feet is recommended for safety.
- Account for any hanging light fixtures in the center of the room when determining placement.
- Consider potential obstacles like ceiling beams that could obstruct the blades.
- Consult the manufacturer’s recommendations for the exact mounting height and clearance specific to your fan model.
Selecting the Appropriate Mounting System
Ideal Placement and Height
Proper placement and mounting height are critical to allow low-profile ceiling fans to move air efficiently throughout the room. Here are some key tips:
- Install the fan centered in the room to optimize airflow. This allows air to circulate evenly to all corners.
- In larger rooms, install two smaller fans on opposite ends instead of one large fan.
- Mount the fan at least 7 feet above the floor for safe clearance, more if possible.
- For fans with lights, account for proper lighting height based on ceiling dimensions.
Optimizing Airflow for Low Ceilings
While flush mount fans are designed to work well even when installed very close to the ceiling, there are some things you can do to maximize airflow:
- Choose a fan with an angled-mount design to push air against the ceiling and spread it out better across the room.
- Install the fan on a longer downrod if ceiling height allows to improve circulation from the blades.
- Select a fan with a higher CFM rating to move more cubic feet per minute with less space.
Installation Tips and Considerations
Installing a flush mount ceiling fan securely and correctly is critical for safety, performance, and longevity. Here are some key tips:
- Use the manufacturer’s hardware designed specifically for your fan model and ceiling type.
- Attach to ceiling joists or blocking for a sturdy mount. Use anchors for drywall or plaster.
- Check that all connections are tight and secure to prevent wobbling.
- Make sure wires are connected properly and enclosed safely before turning power on.
- Carefully measure and center the fan between walls and within the room.
Features to Look for in Ceiling Fans for Low Ceilings
Size and Blade Span
An ideal low-profile ceiling fan should be sized appropriately for the dimensions of your room:
- For rooms up to 75 sq ft, choose a fan with blade spans between 36 and 42 inches.
- For rooms 75 to 144 sq ft, ideal blade spans are 44 to 50 inches.
- Bigger rooms can accommodate larger fans, but ensure sufficient clearance.
Motor Power and Efficiency
More powerful fan motors move air more efficiently in rooms with lower ceilings:
- Look for higher CFM ratings between 5000 and 7500+ CFM for optimal airflow.
- DC motors are most energy efficient and long-lasting.
- Make sure the motor is designed for flush ceiling mounting.
Noise Levels
Due to tighter clearance, airflow noise is a concern with low-profile fans. Seek models with features like:
- Reversible whisper-quiet blades optimized for flush mounting.
- Sound-dampening motor housing and mounting.
- Noise levels less than 50 decibels, or even 35-45 dB for very quiet operation.
Style and Aesthetics
Flush mount ceiling fans come in a wide range of finishes and designs to match any room decor, like:
- Industrial, nautical, bohemian, modern, contemporary, and traditional styles.
- Matte, brushed, polished, weathered, or painted finishes.
- Integrated LED lighting in white, vintage, or color temperatures.
- Reversible blades in different finishes.
Installing and Maintaining Ceiling Fans for Low Ceilings
Step-by-Step Installation Guide
Installing a flush mount ceiling fan properly ensures safe operation and optimal performance. Follow these key steps:
- Turn off power at the breaker.
- Securely mount the mounting bracket centered between joists.
- Install the downrod if using one, or else connect the fan directly to the bracket.
- Attach the fan blades according to the manufacturer’s instructions.
- Connect the wires – black to black, white to white, green/bare copper to green screw or wire.
- Tuck wires safely into the electrical box.
- Attach the fan housing over the bracket.
- Install included light kit and bulbs if the fan includes lights.
- Turn power back on and test operation of fan speeds and lights.
Maintenance Tips for Optimal Performance
Regular maintenance keeps your flush mount ceiling fan running smoothly for years. Be sure to:
- Check mounts and hardware twice yearly to ensure all connections are secure.
- Clean fan blades and housing periodically with soft brush or vacuum to remove dust and dirt.
- Wipe down metal finishes with non-abrasive cleanser to prevent tarnishing.
- Replace any damaged or worn parts like blades, switches, or pull chains.
- Re-balance blades if wobble develops over time.
Troubleshooting Common Issues
Some occasional issues can arise with flush mount ceiling fans. Here are some common problems and solutions:
- Fan wobbles – Check for damaged blades, loose hardware, shifting balance. Re-secure mounts or replace defective parts.
- Fan noisy – Clean debris from blades, check for loose parts, replace worn motor bearings.
- Lights not working – Check bulbs, wiring, switches/dimmers. Replace burnt out bulbs.
- Intermittent operation – Could indicate loose wiring connections, faulty switch, or worn capacitor.
Maximizing Comfort and Efficiency
Optimizing Air Circulation in Low Ceiling Rooms
Careful placement plus optimal fan settings can greatly improve air circulation in rooms with lower ceilings:
- Angle heads on flush mount fans to push air outward in all directions.
- Run fan on higher speeds to keep more air moving with less overhead space.
- Reverse fan direction based on season to pull warm or cool air up as needed.
- Pair floor, table, or window fans to work in tandem with ceiling fan airflow.
Energy Efficiency and Cost Savings
Choosing an ENERGY STAR rated flush mount ceiling fan ensures outstanding efficiency and performance:
- ENERGY STAR fans are 60% more efficient on average.
- DC motors cut power consumption significantly compared to AC.
- Well-designed blades, less friction, and better components reduce loads.
- Save up to $15/year per fan on energy costs with efficient operation.
Final Thoughts on Selecting the Perfect Ceiling Fan for Low Ceilings
Finding an ideal flush mount or low-profile ceiling fan tailored for rooms with less overhead space comes down to a few key considerations covered here:
- Match fan size to room dimensions for optimal circulation.
- Prioritize safety with adequate blade clearance.
- Choose features focused on quiet, wobble-free operation.
- Select durable, energy efficient motors and components.
- Install securely with robust mounting rated for fan weight.
- Maintain properly with regular cleaning and hardware checks.
By keeping these factors in mind and applying the helpful installation and troubleshooting tips provided, you can enjoy cool comfort and attractive style with a flush mount ceiling fan even in rooms with low ceilings.