Drawers are an essential part of any home. They provide convenient storage solutions in kitchens, bedrooms, offices, and more. However, after years of use, drawers can become loose, shaky, or completely non-functional.
Replacing an entire drawer unit can be expensive. The good news is that with a few simple repairs, old drawers can be revived to feel sturdy and work smoothly again. This article will explore budget-friendly DIY methods for repairing various drawer issues to restore functionality and enhance aesthetics.
- Understanding the Current Condition of Your Drawers
- Benefits of Refurbishing Your Drawers
- Preparing Your Drawers for Repair
- Assessing the Damage
- Identifying Common Issues with Drawer Functionality
- Evaluating Aesthetics and Finishing
- Choosing the Right Repair Method
- Refinishing Wood Surfaces
- Repairing Drawer Slides and Hardware
- Replacing Drawer Components
- Budget-Friendly Repair Techniques
- DIY Wood Restoration
- Applying Wood Stripper
- Scraping off Paint and Residue
- Sanding and Staining
- Odor Removal and Musty Smell Solutions
- Using White Vinegar to Absorb Odors
- Cleaning Interiors with Vinegar
- Fixing Out-of-Whack Dresser Drawers
- Applying Strong Glue for Sturdy Repairs
- Painting for Aesthetic Enhancement
- Simple Maintenance Tips
- Preventing Future Damage
- Proper Cleaning and Care
- Maintaining Drawer Functionality
- Enhancing Aesthetics
- Painting and Refinishing Techniques
- Upgrading Drawer Hardware
- Final Thoughts on Reviving Your Drawers
Understanding the Current Condition of Your Drawers
Before beginning any repairs, it’s important to thoroughly assess the current state of your drawers. Examine each drawer when pulled out to determine what exactly needs fixed or replaced. Common problems include:
- Wobbly drawers from broken joints or detached rails.
- Sticking drawers that won’t slide smoothly due to warped wood or debris buildup.
- Missing or broken drawer pulls and handles.
- Cracks, scratches, fading, or other cosmetic damage.
Inspect all sides, joints, and interior surfaces. Check drawer rails and slides as well. This will help you identify the root causes of any functionality issues.
Benefits of Refurbishing Your Drawers
Saving money is an obvious advantage of DIY drawer repairs versus purchasing brand new drawer units. However, restoring your existing drawers also offers additional benefits like:
- Retaining vintage charm – Refinished antique or vintage drawers maintain the unique character missing from modern mass-produced furniture.
- Customizing storage – Tailor each drawer’s size and layout to your exact needs during repairs.
- Reducing waste – Breathing new life into old drawers is eco-friendly and sustainable.
- Learning useful skills – DIY repairs teach you how to maintain and enhance all the wood pieces in your home.
Preparing Your Drawers for Repair
Assessing the Damage
To choose suitable repair methods, you’ll first need to thoroughly examine your drawers’ current condition. Identifying specific problems will dictate certain solutions over others when restoring functionality and aesthetics.
Identifying Common Issues with Drawer Functionality
Pay special attention to joints, slides, and moving components during inspection. Functionality problems typically arise when:
- Joints loosen from wood wearing down or coming unglued.
- Drawer slides become bent or dirty with built-up gunk.
- Bottom boards detach partially or fully from side panels.
Test each drawer’s ability to open and close smoothly. Determine what needs tightened, stabilized, cleaned, or replaced to restore proper functioning.
Evaluating Aesthetics and Finishing
While assessing damage, also make notes about the current visual appeal of your drawers such as:
- Missing or broken hardware like pulls, handles, or knobs.
- Gouges, cracks, chips, peeling veneers, etc..
- Faded original color/finish due to sun exposure.
- Paint splatters or other cosmetic damage.
This will help you address all aesthetic issues during the repair process too.
Choosing the Right Repair Method
With a complete understanding of existing drawer damage and desired results, you can determine the best repair techniques for your needs. Available options include:
Refinishing Wood Surfaces
Refurbishing worn, faded wood with new stain or paint enhances appearance. Gently sand damaged areas before applying finishes.
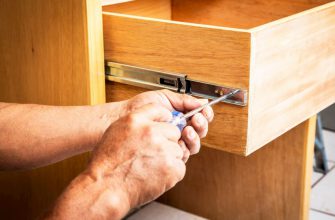
Repairing Drawer Slides and Hardware
Lubricating slides or replacing broken pulls and handles restores smooth function. Consider upgrading to soft-close slides.
Replacing Drawer Components
Swapping out broken bottom boards, cracked panels, missing joints, or entire damaged drawers gets them working again.
Assess whether to spot treat certain issues or fully refinish for a uniform look. With the right supplies and some DIY knowledge, you can employ multiple methods to revive your old drawers.
Budget-Friendly Repair Techniques
Don’t let a tight budget stop you from restoring your drawers. Affordable solutions using common household items yield great results. Get creative with materials on hand for an eco-friendly revamp.
DIY Wood Restoration
Refurbishing worn natural wood finishes requires just a few simple steps for a dramatic facelift.
Applying Wood Stripper
Removing old finish with store-bought remover or diluted solvents prepares surfaces for staining. Wear gloves and work in a ventilated area.
Scraping off Paint and Residue
After stripping, use a plastic paint scraper to lift any remaining bits of old finish off the wood. Avoid scraping too hard to prevent damage.
Sanding and Staining
Lightly sand stripped wood using 120-150 grit paper to smooth and even the surface. Wipe away dust before brushing on new stain in your desired shade.
Odor Removal and Musty Smell Solutions
Drawers stored in damp basements or garages sometimes retain musty odors. Kill smells naturally using:
Using White Vinegar to Absorb Odors
Wipe down all interior surfaces with undiluted white vinegar, allowing it to dry completely. The acidity counteracts stubborn lingering odors.
Cleaning Interiors with Vinegar
For a deeper clean, scrub the inside of drawers with a vinegar-water solution. Rinse thoroughly afterwards and let air dry before replacing contents.
Fixing Out-of-Whack Dresser Drawers
Over time, dresser drawers can become misaligned and fail to close properly. DIY realignment fixes this annoying issue.
Applying Strong Glue for Sturdy Repairs
If joints have come loose, use wood glue to re-secure them, clamping pieces together while drying. Clean up any oozing glue immediately using a damp cloth.
Painting for Aesthetic Enhancement
Give tired old dressers new life with a fresh coat of paint in your chosen color. Sand first, apply primer, and use properly layered paint for the most durable finish.
Simple Maintenance Tips
With your drawers revived and functioning smoothly again
With your drawers revived and functioning smoothly again, implementing some simple maintenance practices will help preserve repairs and prevent future issues.
Preventing Future Damage
Treating your refinished drawers properly ensures they remain in good working order by avoiding unnecessary wear and tear.
Proper Cleaning and Care
Use soft cloths dampened with mild cleaner to dust drawer exteriors. Insides may need occasional deeper cleaning by removing contents and washing with a vinegar-water solution.
Maintaining Drawer Functionality
Every few months, lubricate slides and tighten any loose screws or hardware. Open and close drawers gently without overextending slides.
Avoid overloading drawers which strains the glides and joints. The weight limit depends on the quality of the slides and hardware.
Enhancing Aesthetics
Apply some simple upgrades to keep your drawers looking their best.
Painting and Refinishing Techniques
Add new color with paint or stain as needed to conceal scuffs or revive wood tones. Use painter’s tape for crisp edges and properly prep.
Upgrading Drawer Hardware
Replace dull handles and pulls with new ones that match your design style. This small change makes drawers look completely refreshed.
Final Thoughts on Reviving Your Drawers
Don’t discard old, worn-out drawers just yet! With a few easy DIY repair and refinishing techniques, you can restore them to full functioning and looking better than ever. The whole process is very budget-friendly.
Follow the steps to properly assess damage, choose suitable repair methods, and execute techniques like gluing joints, sanding/staining wood, fixing slides, replacing hardware, and more. A full drawer restoration allows you to customize storage to suit your needs.
Implemented some simple maintenance habits like proper cleaning, lubricating slides, and distributing weight evenly. Your revived drawers will provide many more years of smooth performance.
So before buying new drawer units or entire dressers, try your hand at reviving your old ones first. Roll up your sleeves and get started on this satisfying DIY project that saves you money while reducing waste!